Monday, 12 October 2015

I have started a quilting bee!

I am super excited to let you know that I have started a quilting bee!
I was looking for modern quilters in Germany who are not involved in a bee already and found some super nice ladies!
 
(The logo was a collaboration with the amazingly talented graphic designer and illustrator Imogen Oh of Oh Hey Friend.)

Meet the bees of the 'Quilty Circle of Bees' (in alphabetical order):

Allison of Campbell Soup Diary
Claudia of Machen und Tun
Melanie of Melanie's Kunstraum
Vicky of Veni Vidi Vicky
Yara of Qvilted
 and me of course :0)

Yes, you counted correctly we are only six members but that is exactly what we wanted.
We have two months time to complete the blocks for the queen bee and we also pause for the months of November and December. We also sew with our own fabrics and only send finished blocks around. Stress free.

Claudia was the first queen bee for the months September/ October and requested paper pieced feather blocks. She did sent us some backgroud fabrics (yes, we make exceptions as well) and a lovely post card which I used to fold the paper. Great!


This was the first time I ever done paper piecing. I was happy that I could play with my scraps again. Luckily the background fabrics matched perfectly with any of my scraps.


I have to say that the paper piecing did come with some challenges for me, I don't know how often I ripped out seams of the first block... sewn in 1.5 mm... no fun!

But I really liked how it turned out. The tutorial for the block is by Blossom Heart Quilt.
The second block was better, but again I had to use my seam ripper - a lot.

Then I was all ambitious to do one block without ripping out seams and this time is almost worked perfectly. I had oddly shaped scraps and that made the piecing in diagonal lines of the feather somehow difficult.


All in all I'm happy how they turned out and I hope Claudia will  as well.
As mentioned before we pause for the next two months but it's actually my turn in January/ February.
I am really happy to be involved in this bee and I'm looking forward to some exciting blocks and quilts!

Linking this to Scraptastic Tuesday and Finish up Friday at Crazy Mom Quilts and WIP Wednesday at Freshly Pieced!

Friday, 9 October 2015

How to - hem a pillow filled with feathers

Two years into sewing and quilting I feel confident enough to give a bit advice on how I do things. For a long time I was the one, who needed guidance and input from tutorials and other quilters (and I still do).
But I have decided that I am adding a section to my blog called  'Tips & Tricks'. I don't dare to call it 'tutorials' (yet).

So, here's my first tip: what to do when you just finished a beautiful pillow case and your pillow is too big?
 

I was really disappointed as I realised that fact and thought, oh no, I need to find a new pillow. I searched the internet and all I could find were pillows in the size I had already.
And then it suddenly dawned on me: I can sew! I can hem the pillow... can't I?

Well, mine was filled with feathers but that didn't stop me.
So, that's what you need to do:

1. Establish by how much you need to hem the pillow. Mine was 65x65cm/ 25x25 inches and needed to be 60x60cm/ 23.5x23.5 inches.So that is 5cm/ 2.5 inches on two sides too big (e.g. bottom and right side)
2. Shake the feathers away from the two edges you want the pillow hemmed.
3. Mark the pillow at e.g. 5cm/ 2.5 inches from the two edges.


  4. Place pins another 1cm/ 1 inch away from the marked line (this is in order to fit it into your sewing machine).


5. Sew along the marked lines all the way at both sides securing the stitch at the beginning and the end. 


6. Get your vacuum cleaner. This is where it gets a bit messy...
7. Cut the hemmed fabric with scissors at approx. 1cm/ 0.5 inches away from the marked line (Do not use your good fabric scissors, you will cut through some remaining feathers). I would also recommend doing this on the floor, and not, as I did, on your cutting mat.


8. Now vacuum clean the feathers away making sure you clean out the cut fabric of the pillow.
9. Sew along the cut fabric using a cross stitch. Ta-da, finished! 


The reason why I left 1cm/ 0.5 inches over besides the marked line is that I thought anything smaller will feel hard when it's hemmed due to the dense stitching. That way the left over bit is soft and just folds inside the pillow case.

The pillow looks quite 'stuffed' due to the same amount of feathers in a smaller pillow but this pillow was a gift to my Mum and she really likes having this pillow in her back while sitting on the couch. All good.

I haven't tried hemming a pillow with a polyester filling, but I guess that kind of works the same way.

So, I hope you enjoyed my little trouble shooting advice.

Linking this to Crazy Mom Quilts - Finish up Friday  and TGFF

Sunday, 27 September 2015

Modern maples quilt October - finished!

Well, the QuiP blog post of this quilt is only 2 weeks ago and today I have 'October' already finished! What got me going was Debbie's inquiry to have the quilt featured in her newsletter 'The scrap basket'. Of course I wanted to show the finished quilt and not only the quilt top or a few blocks. So here it is:


I'm really happy how it turned out in the end, I like the fabric line Twenty Three by Cosmo Cricket and the mix of blocks with and without the dark stem.


Half way through piecing the quilt top I thought this quilt is going to be too light and too beige and I had doubts if I should not have done the sashing (also in beige) but the quilting kind of connected all the blocks and it came together nicely.


I quilted in loops and swirls, just like leafs do when they fall off the tree. This is only the second time I did this quilting stitch but I felt so much more confident. I used Aurifil 40wt in beige.
I used different batting as well, normally I use 100% cotton batting but this time I tried out 'warm and natural' from the Warm Company... and that was a dream to quilt!


I have not washed the quilt yet, the batting will only shrink by 3% but I think the quilting gives the quilt already a nice crinkly look and I hope that after the wash this will even increase a bit.


For the back I used two left over blocks, which I found too light for the front, and used left over strips of fabric and for the left half of the back probably my favourite fabric from the line, the cameras.


I do love photography and I took these photos in the botanical gardens. I had hope for more coloured leafs... I guess it's still too early in the autumn. But you can see nature already changing.


I caught the last bit of sunshine that day and I just love how leafs change their colour, just as if nature wants to show off its beauty before the bleak winter sets in.


I also found this old stem of a tree covered in mushrooms:


How cool is that?

So, back to the quilt. Here it is again in all its beauty!


Thank you, Debbie, encouraging me to finish the quilt and for having me on 'a quilter's table'!

Also linking this to Crazy Mom Quilts - Finish up Friday and TGIFF!

Saturday, 26 September 2015

Modern maples pillow

It was my Mum's birthday recently and I had told her, that I wanted to make her a pillow. So I had asked her what style she'd like.... and she said: 'Oh, I love these maple leafs, but can you make me some in green and turquoise?' Me, obviously humbled by that request, replied:' Of course!' and got to work.


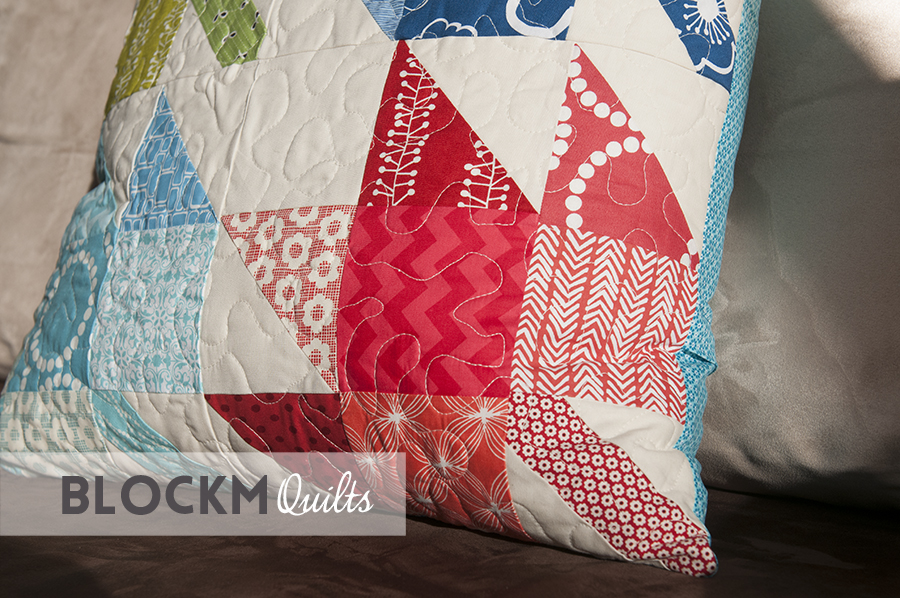
It's a big pillow of about 60x60cm / 25x25 inches and I made the blocks from the same pattern I used for my 'October' quilt. The blocks are 12.5 inches each. I used assorted printed fabrics and combined it with Kona cotton 'bone'.


I added a red block as well, which I thought goes well with the greens, blues and turquoise. I quilted with a simple meandering free motion quilt stitch, which still needs a bit of practice.


I opted for the concealed zipper again using this tutorial, which I like very much.

You might notice that the pillow looks quite 'stuffed'. Well, that's because I used a block design which turned out to be smaller than the actual pillow... so I just hemmed the pillow! Yes, with the feathers coming out and everything!

But more about that later, I thought a do a separate blog post about that.
Here's the link to the post! 

Linking this at the last minute to Crazy Mom Quilts Finish up Friday! 

Friday, 11 September 2015

QuiP #5 - Quilt in progress - Modern maple quilt 'October'

Remember these first two modern maple blocks I made last year?


I tried these blocks out and posted them in line with my turn of the around the world blog hop tour in November 2014.

Well, my aim is to have 'October' (that's how I named the quilt) done in October this year.


Meanwhile I have all blocks done and I'm really looking forward to have it finished! For the blocks I followed this tutorial by Amanda Woodward-Jennings. 


Besides the beautiful fabric collection Twenty Three by Cosmo Cricket for Moda I have used some autumn solid colours and used three different beige tones for the background. The beige tones are very equal and there is only a slight difference but I like it that way.


The quilt top is almost finished and I also know how the quilt back is to look like. I have an idea for the quilting as well so it shouldn't take that long.

So, off to the sewing machine now!

Linking this to Freshly Pieced WIP Wednesday

Friday, 28 August 2015

My first pillow!

I am still in my 'easy fixes stage' where I need quick results. So I made a pillow.


As I've seen the beautiful fabric by Joel Dewberry 'Antler Damask' for Free Spirit I immediately knew I had to make a pillow out of it. I did some fussy cutting in a big scale.


Since the pillow is only made from one fabric I thought I give it a bit of 'pep' with bright red piping.


For the back I used the cross hatch fabric by Carolyn Friedlander in curry, a real favourite of mine right now! I followed this tutorial for the invisible zipper, that worked quite well.


The pillow is 25 x 25 inches big and my husband has occupied it for himself. That's fine with me, I love it when self-made things get used a lot.

Linking this with Crazy Mom Quilts 'Finish up Friday'!

Sunday, 19 July 2015

Scrappy key lanyard

I have made another scrappy little project: a key lanyard for my niece!


My niece is 11 now and uses her own key from time to time, so I made her a nice key lanyard she can wear as little, useful accessory.


I picked one of my favourite fabric scraps and cut them into even widths (3 times as wide as the metal clip thing). I used fusible batting as an inlay and folded the fabric edges in to the required width and quilted in straight lines.


My niece loved it and I will make one for myself when I go over to the US to attend QuiltCon in February 2017 in Savannah!!

Monday, 22 June 2015

Scrappy Kindle case

I recently enjoy sewing small things with quick results. I really do enjoy the process of quilt making but every now and then there has to be a speedy little sewing project.


I have always wanted to make a case for my kindle... I suppose just to have one, because really the kindle is in a hard cover and protected enough... but a self made case is sooooo nice, right? 

I made this from scraps, my scrap glasses really do inspire me as I see all my scraps every day. And since the storing space is limited I need to use them.


I used scraps  in grey and orange, this is such a lovely colour combination (and matches the orange coloured kindle hard cover my husband got me together with the actual Kindle!)

The individual scrap pieces are 2 x 3'' big and sewing them together in rows of 5 x 4 created an almost perfect fit for the case already. I have used this tutorial as a guidance, but adjusted the flap to the whole width and measured the size of the kindle and added approx. 1inch to each side in order to estimate the size of the covers needed.


The kindle fits perfectly in it even though the I calculated the position of the velcro wrongly. I measured without the kindle being in the case, so now it just catches.


And as I was finished I thought I could have just added another row of scraps to the one case cover and not sewn the flap on separately. 


But this is something I can adjust when I make a second case.

Linking this to Scraptastic Tuesday.

Thursday, 4 June 2015

Cathedral window pin cushion

I have always admired something made from cathedral window blocks. It always looked so beautiful but also super complicated. After I have seen this pin cushion and learned how easy it actually is, I thought I should give it a try.

I made a pin cushion for myself  from my scraps following this tutorial which is free, you should try it out!


I have always wanted a pin cushion and that was just a perfect way to try the cathedral window block.
Turns out it isn't complicated at all, just following some simple steps and there's a lot of ironing involved.


It took me a long time to find a nice button, but I'm happy with the red one with the carvings on it.

So, next thing to try is a pillow made from cathedral windows, I'm not afraid anymore!!

Linking this to Crazy Mom's Finish up Friday!

Sunday, 31 May 2015

Mug rug swap with the lovely ladies of the MQG Individual Members

I am super excited to be involved in my very first swap project! This one is from the individual members of the Modern Quilt Guild! 

My swap partner is Carmen and she wrote about her favourite colours:

orange, green, aqua, that pinky berry color :), not too many colors I don't like. I will love what you make so please don't stress over what to make - make what speaks to you and have fun doing it.
Very nice! 


So, and that's what I made her:


I emptied my scrap glasses and selected a few of my favourite colours: turquoise, yellow and red.
I went with kind of a coin block design and stacked the scraps from medium to dark volume. I absolutely love the cross hatch fabrics by Carolyn Friedlander and they go so well with the bright colours.
I used simple straight line quilting in irregular distances and yellow binding.


The size is about 8 x 7,5''. That's big enough to hold two espresso cups or....


one large mug and some sweets to go with your tea or coffee.


For the back I used this lovely fabric with little vintage TVs, I just loved the idea of having a tea in front of the telly.

So, Carmen, I hope you like your new mug rug, it will go in the post tomorrow!

Linking this to Crazy Mom Quilts and Sraptastic Tuesday.