And will it actually work?
That question was in my head for about three months. I was debating with myself whether to leave the quilt as distorted as it was and just live with it or try to go the extra mile and block it.
After my 'Purple Haze' quilt won 1st place in the international entries of the 'quilt top only category' in this year's Pantone Quilt Challenge I was very eager to start quilting it. I noticed some fabric shifting during the process but did not expect the outcome of it to be that bad!
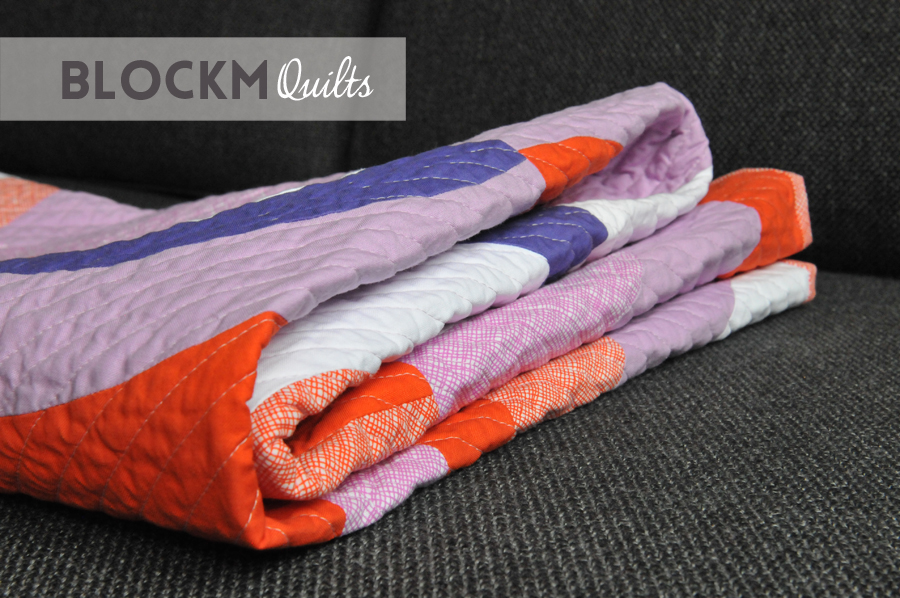
In the space of 15.5" the quilt was out of shape for almost 1". That continued to be about 4.5" by the end of the quilt (see first photo above, quilt folded in half). I'd never have such a distorted quilt. I asked the quilting community for some advice as to why this happened.
Curved blocks apparently are a bit tricky and are prone for fabric shifting during the quilting process. I didn't know that, that's the first curved quilt I've made. And on top of it I opted for diagonal straight quilting lines... bad combination.
Deadlines are always a good motivator. As I've seen that the Bloggers Quilt Festival is due I just decided to give blocking a go. I've watched a good few tutorials and people used their carpet for blocking quilts. Since we only have timber floors I used my recently purchased insulation boards as base to pin the quilt into. By coincident the boards have a lovely lilac colour that suited the quilt very well. The boards are actually to become my new design wall, I still need some flannel to cover them.
But first the question: do I bind before or after the blocking process? And what will happen with my quilt when I wash it without the binding? I have heard that people blocked their quilts with and without the binding and had equally good results. Since my quilt was so badly distorted I decided to wash the quilt without the binding but sewed along all edges to secure the quilting stitches beforehand.
I washed the quilt in the washing machine for a bout 10 minutes at a very gentle cycle and only put the spin on for about 30sec. I was so afraid that the quilting would rip apart but it was all good. Some people put the quilt in the bathtub, I guess that works as well.
It actually wasn't that difficult to pull the quilt into shape. I used the perfect 90degree angle of the boards as a guide and started pinning the quilt in place. I marked the boards with tape to indicate the shape the quilt should have and left the quilt in place for 1.5 days to dry out.
I'm so happy now with this quilt! I just applied the binding today and will make this a last minute entry into the Bloggers Quilt Festival.
Unfortunately we have terrible rainy weather here today so I could only take indoor photos. I'm planning to take better photos outside and will do another blog post soon. But here it is, nice and square!
The result is better than expected. The quilt still is not perfectly square but I am totally happy with the way it turned out.
Before I blocked the quilt I had asked some quilty friends: so what happens with that blocked quilt when I wash it again? Will it loose it's shape again? Do I need to pull it into shape every time I wash it? Most people only block their quilts when it's a wall hanging quilt or to be issued for a show and basically never to be washed again, so no one really could answer that. If you have some experience with that please leave a comment!
I think I'll hang 'Purple Haze' up for a bit and enjoy these happy colours and I guess time will tell how the shape behaves after washing again.
So was it worth it to block the quilt? Definitely yes! Did it work? Surprisingly yes! Will I do it again? Well, I hope this doesn't happen that often but yes, I would definitely block a quilt again and next time I'm not waiting three months to do it!
I'm linking to the Bloggers Quilt Festival hosted by Amy Ellis. Go and see some amazing quilts!
Also linking to Finish up Friday at Crazy Mom Quilts
Showing posts with label crosshatch Carolyn Friedlander. Show all posts
Sunday, 23 September 2018
Friday, 11 May 2018
Pantone Quilt Challenge 2018 - Purple Haze (a finished quilt top)
I am so happy to take part in this year's Pantone Quilt Challenge again and that the category 'Quilt Top Only' exists as entry. Our recent move kept me so busy that I wasn't able to finish a whole quilt in time.
So this year's Pantone colour of the year is Ultraviolet. I had some problems finding matching colours but in the end I was very happy with my choices of Kona Bright Peri as equivalent to Ultraviolet, Kona Corsage as light violet, Kona white and Kona Tangerine as a pop of bright orange. As often I mixed it with the beautiful Carolyn Friedlander cross hatch fabrics. I can't help myself, I just love them.
I also seem to have the suitable Pantone cup for every quilt challenge I do, this one is an espresso cup and it even has some milky foam and coffee in it!
I wanted to do something bright and cheery for this quilt and opted do to improv curves. That was the first time I did improv curves and they were a bit scary but after a few blocks I really enjoyed the whole process!
I was looking for an alternative layout other than having all blocks in one direction or forming circles. So I came up with this design:
As often my husband came up with the name for the quilt: Purple Haze. Very suitable I think.
I love this quilt top so much already and can't wait to finish the quilt. The whole colour scheme, the sewing technique and the quilt layout itself is so outside my comfort zone and unlike anything I did before. But that's what a challenge is for, right?
Quilt stats:
Name - Purple Haze
Category - Quilt Top Only
Size - 1.50x150m/ 59x59"
Country - Germany
Linking to Bryan House Quilts and No Hats in the House and thanking Rebecca and Sarah for hosting the challenge again this year!
UPDATE: Purple Haze has won 1st place in the 'Quilt top only' Global category!!!
Wow, I'm very happy and honored!
See here all the amazing winners.
So this year's Pantone colour of the year is Ultraviolet. I had some problems finding matching colours but in the end I was very happy with my choices of Kona Bright Peri as equivalent to Ultraviolet, Kona Corsage as light violet, Kona white and Kona Tangerine as a pop of bright orange. As often I mixed it with the beautiful Carolyn Friedlander cross hatch fabrics. I can't help myself, I just love them.
I also seem to have the suitable Pantone cup for every quilt challenge I do, this one is an espresso cup and it even has some milky foam and coffee in it!
I wanted to do something bright and cheery for this quilt and opted do to improv curves. That was the first time I did improv curves and they were a bit scary but after a few blocks I really enjoyed the whole process!
I was looking for an alternative layout other than having all blocks in one direction or forming circles. So I came up with this design:
As often my husband came up with the name for the quilt: Purple Haze. Very suitable I think.
I love this quilt top so much already and can't wait to finish the quilt. The whole colour scheme, the sewing technique and the quilt layout itself is so outside my comfort zone and unlike anything I did before. But that's what a challenge is for, right?
Quilt stats:
Name - Purple Haze
Category - Quilt Top Only
Size - 1.50x150m/ 59x59"
Country - Germany
Linking to Bryan House Quilts and No Hats in the House and thanking Rebecca and Sarah for hosting the challenge again this year!
UPDATE: Purple Haze has won 1st place in the 'Quilt top only' Global category!!!
Wow, I'm very happy and honored!
See here all the amazing winners.
Tuesday, 1 May 2018
Three
I have finally found the time to share the mini quilt I made for the 2018 MQG Mini Swap. I was very excited about the swap and signed up to exchange the mini quilts at QuiltCon in Pasadena.
As I received the email with my swap partner I thought: Wow, Anne Sullivan of PlayCrafts is making me a mini quilt!!! And then immediately after that I thought: Oh F#@$%& I have to make her one too!
Anne is such an amazing quilter that the pressure to make her something awesome was big.
After three attempts I made this mini quilt which I called 'Three' giving the circumstances...
I improv pieced strips together and grouped them from light to dark. I like the little craziness in it, so much to look at. The binding is multi coloured as well and plays with the colour arrangement of the actual quilt.
I picked two different shades of violet and paired it with a Friedlander cross hatch fabric in the same colour family. I started with white and light turquoise in one corner and worked my way up to the darker top of the quilt. 'Three' is 24x24" small.
The top also has some orange colour splashes to add a little interest. I used 5 different coloured threads, all Aurifil 50wt, and quilted diagonal straight lines similar to the way I quilted Splinter.
For the back I used remaining fabrics and just pieced a crazy log cabin block. I'm very happy how this mini quilt turned out and I'm so glad that Anne liked it too!
And that's us exchanging our quilts at QuiltCon. I absolutely love the mini Anne made me and isn't it amazing how well our quilts look together? We even made the MQG February news letter!
I'll definitely take part in next years mini swap. Not sure if I will go to QuiltCon though but the minis can still be send via post (although it's so great to see the recipient's face while you exchange quilts and it's always so good to meet other quilters in person).
And I also think I'm going to revisit this design, I'd like to play with it a bit more at a larger scale!
Linking this to SewFreshQuilts and Let's bee social
and Finish Up Friday at CrazyMomQuilts
As I received the email with my swap partner I thought: Wow, Anne Sullivan of PlayCrafts is making me a mini quilt!!! And then immediately after that I thought: Oh F#@$%& I have to make her one too!
Anne is such an amazing quilter that the pressure to make her something awesome was big.
After three attempts I made this mini quilt which I called 'Three' giving the circumstances...
I improv pieced strips together and grouped them from light to dark. I like the little craziness in it, so much to look at. The binding is multi coloured as well and plays with the colour arrangement of the actual quilt.
I picked two different shades of violet and paired it with a Friedlander cross hatch fabric in the same colour family. I started with white and light turquoise in one corner and worked my way up to the darker top of the quilt. 'Three' is 24x24" small.
The top also has some orange colour splashes to add a little interest. I used 5 different coloured threads, all Aurifil 50wt, and quilted diagonal straight lines similar to the way I quilted Splinter.
For the back I used remaining fabrics and just pieced a crazy log cabin block. I'm very happy how this mini quilt turned out and I'm so glad that Anne liked it too!
And that's us exchanging our quilts at QuiltCon. I absolutely love the mini Anne made me and isn't it amazing how well our quilts look together? We even made the MQG February news letter!
I'll definitely take part in next years mini swap. Not sure if I will go to QuiltCon though but the minis can still be send via post (although it's so great to see the recipient's face while you exchange quilts and it's always so good to meet other quilters in person).
And I also think I'm going to revisit this design, I'd like to play with it a bit more at a larger scale!
Linking this to SewFreshQuilts and Let's bee social
and Finish Up Friday at CrazyMomQuilts
Thursday, 30 November 2017
Splinter
I feel very proud today. Proud of my self.
I think people, including me, are so overly critical with themselves and their work in particular. So today I feel very proud of myself because I have reached a goal I set for myself and accomplished it beyond my expectations.
This is Splinter. My best work yet.
With Splinter I wanted to create great tension between very precise vertical and horizontal piecing as opposed to improvisational diagonal piecing.
The improv pieced vertical off-centered 'splinter' is to divide the black and white fabric with what seems like great force. The name was quickly found.
I think people, including me, are so overly critical with themselves and their work in particular. So today I feel very proud of myself because I have reached a goal I set for myself and accomplished it beyond my expectations.
This is Splinter. My best work yet.
With Splinter I wanted to create great tension between very precise vertical and horizontal piecing as opposed to improvisational diagonal piecing.
The improv pieced vertical off-centered 'splinter' is to divide the black and white fabric with what seems like great force. The name was quickly found.
I revisited this design after I made a back of a triangle quilt with left over half-triangles in a similar arrangement.
With 'Splinter' there was a lot of editing and careful arrangement of colour and shape placement to achieve a high visual impact of negative space with indistinct edges.
I quilted straight lines with white Aurifil 50wt thread first, creating diagonal lines from top right to bottom left.
I then added dark grey thread in the opposite direction. Seams of the same colour never overlap. With having the seams in random angles they create this beautiful secondary pattern of the 'improv spikes'.
For the back I used a lot of orange solid fabric and arranged other left overs from the front in an interesting off-centered design.
Even on the back the quilting looks so good!
I recently bought a Juki QVP 2200 Mini. Before that I was never able to quilt like this. I could never adjust my presser foot pressure, I had severe fabric shiftings. I could only dream of overlapping quilting seams like that.
I did have some difficulties with the Juki though, it took me ages to get the thread tension right. But now I think the Juki and me are ok.
I played with different coloured binding as well. The design of the quilt is extending into the binding which I like a lot.
There are exactly three seams of orange thread in Splinter, one going through every orange fabric of the quilt.
I hand sewed the binding again and really love how this turned out.
The reason I feel that this is my best work yet is that Splinter is definitely the quilt with the highest visual impact in terms of simplicity, overall design and quilting. The workman ship from start to finish is also the best to date. There is absolutely nothing I don't like or that could have been better.
So I cherish that feeling and be a bit proud of myself. Something we all should do more and be more gentle with ourselves.
I am entering Splinter into the 'Negative Space' category for QuiltCon 2018.
Here is a link of how I actually made Splinter.
Saturday, 25 November 2017
QuiP #8 - Splinter
Remember this quilt?
The back of my 'Porcupine Playground' quilt just never ceased to amaze me. I knew that someday I would have to revisit this design and make an actual front out of the back I initially designed. So the upcoming QuiltCon submission was a good opportunity to do so.
My plan was to achieve high visual impact with contrasting colours. So I opted for black and white solids, mixed with the ever so amazing cross hatched fabrics by Carolyn Friedlander and the same orange solid I used in 'Porcupine Playground'.
For the back of 'Porcupine Playground' I used left over half-triangles for the off-centered vertical strip. I now improvised the piecing for that dividing strip. I used this tutorial by Debbie of 'A Quilter's Table' to make 'improv spikes'. First back ones.
Then white ones. My aim was to use a lot of negative space beside that vertical strip of spikes and have indistinct edges, so basically you don't see where the black fabric ends and where the white fabric starts.
I repeated the idea of having little orange areas in the quilt as focal points to add a little interest.
Whereas the back of my 'Porcupine Playground' quilt was to use up scraps and left over fabrics there was a lot of editing and careful arrangement of colour and fabric placement this time round.
I quilted straight lines with white Aurifil 40wt thread first and wanted to quilt with black thread as well, but that didn't go according to plan. I don't know of you have ever tried to sew with black thread on white fabric, but it just doesn't look good.
I spent an entire weekend trying to figure this out. I thought it's my thread tension (which was a bit off) but it seems as though a lot of people had similar difficulties. Apparently the loop from the bobbin thread is so visible on the white fabric that it just looks odd.
So I used dark grey thread instead, and I was so happy that I did. Black thread on black fabric is invisible. Not so the dark grey, it created a such nice texture. Exactly what I wanted.
I used a lot of orange solids for the back. The different coloured thread looks so good on it!
And I applied the binding again by hand. Three evenings. That seems to be the standard time frame for my size of quilts. This one is rather big though with 60 x 84" (1.52 x 2.33m).
I just finished it in time for the QuiltCon submissions. Fingers crossed that it gets accepted!
Stay tuned for the full reveal of 'Splinter'.
![]() |
| Porcupine Playground Front + Back |
My plan was to achieve high visual impact with contrasting colours. So I opted for black and white solids, mixed with the ever so amazing cross hatched fabrics by Carolyn Friedlander and the same orange solid I used in 'Porcupine Playground'.
For the back of 'Porcupine Playground' I used left over half-triangles for the off-centered vertical strip. I now improvised the piecing for that dividing strip. I used this tutorial by Debbie of 'A Quilter's Table' to make 'improv spikes'. First back ones.
Then white ones. My aim was to use a lot of negative space beside that vertical strip of spikes and have indistinct edges, so basically you don't see where the black fabric ends and where the white fabric starts.
I repeated the idea of having little orange areas in the quilt as focal points to add a little interest.
Whereas the back of my 'Porcupine Playground' quilt was to use up scraps and left over fabrics there was a lot of editing and careful arrangement of colour and fabric placement this time round.
I quilted straight lines with white Aurifil 40wt thread first and wanted to quilt with black thread as well, but that didn't go according to plan. I don't know of you have ever tried to sew with black thread on white fabric, but it just doesn't look good.
I spent an entire weekend trying to figure this out. I thought it's my thread tension (which was a bit off) but it seems as though a lot of people had similar difficulties. Apparently the loop from the bobbin thread is so visible on the white fabric that it just looks odd.
So I used dark grey thread instead, and I was so happy that I did. Black thread on black fabric is invisible. Not so the dark grey, it created a such nice texture. Exactly what I wanted.
I used a lot of orange solids for the back. The different coloured thread looks so good on it!
And I applied the binding again by hand. Three evenings. That seems to be the standard time frame for my size of quilts. This one is rather big though with 60 x 84" (1.52 x 2.33m).
I just finished it in time for the QuiltCon submissions. Fingers crossed that it gets accepted!
Stay tuned for the full reveal of 'Splinter'.
Saturday, 15 July 2017
I made a Sew Together Bag!
I have always admired the Sew Together Bag but never attempted it as it looked... complicated.
But since I have set up my sewing corner in our living room while still cutting fabric on our kitchen table I have sewing tools in two places.
That really started to annoy me so I decided to make a Sew Together Bag to keep all my stuff together.
This bag is just genius! I have my very regular sewing tools in the open pockets so when I open the main bag they are readily available. My seam ripper is in the pink cross hatch pocket not visible. I also opted for a little pin cushion at the outer pocket.
I had so many left overs from my 'Playground Quilt' that I used these and bought zippers to match.
In fairness the bag is not easy to sew. And if it wouldn't be for Heather's Sew Along at QuiltBarn I would have never been able to make the bag. So thank you, Heather, for the very detailed blog posts with lots of photos!!!
I was looking at a lot of Sew Together Bags online for inspiration and found this blog post by Amanda of Crazy Mom Quilts and opted for little fabric pieces at the end of each zipper.
Not only does it add a little more colour it also is easy to sew. Since this is my first bag and I have not tried it without these fabric pieces but I would always do it again that way.
I quilted the outside panel of the bag in straight lines using three different Aurifil wt40 threads. This was actually the first time I quilted with my new Juki and I loved it!!
I also like that the bag looks so different at each side.
Inside the zipper pockets I have the less needed tools such as wonder clips, hera marker, measuring tape and small ruler, additional scissors and a finger hat.
I am currently making another bag as a present for my friends since I have a lot more scrappy strips left over to use for the outside of the bag.
I'm using the same fabrics again for the second bag apart from the pink fabric to the right in the photo. I realised that one open pocket in my bag is all in one colour (the mustard/white print) and to add a bit more variety I'm going with pink from the inside.
For the binding I used one of my favourite fabrics: Carolyn Friedlander's cross hatch in mustard.
I have also attached a little pink ribbon to the outer zipper, that is a little bit easier to open and looks good.
This will not be my last Sew Together Bag, I need at least two more in my house for various items to store. Also, this makes a great present!
The pattern can be found here and is by Michelle of SewDemented.
But since I have set up my sewing corner in our living room while still cutting fabric on our kitchen table I have sewing tools in two places.
That really started to annoy me so I decided to make a Sew Together Bag to keep all my stuff together.
This bag is just genius! I have my very regular sewing tools in the open pockets so when I open the main bag they are readily available. My seam ripper is in the pink cross hatch pocket not visible. I also opted for a little pin cushion at the outer pocket.
I had so many left overs from my 'Playground Quilt' that I used these and bought zippers to match.
In fairness the bag is not easy to sew. And if it wouldn't be for Heather's Sew Along at QuiltBarn I would have never been able to make the bag. So thank you, Heather, for the very detailed blog posts with lots of photos!!!
I was looking at a lot of Sew Together Bags online for inspiration and found this blog post by Amanda of Crazy Mom Quilts and opted for little fabric pieces at the end of each zipper.
Not only does it add a little more colour it also is easy to sew. Since this is my first bag and I have not tried it without these fabric pieces but I would always do it again that way.
I quilted the outside panel of the bag in straight lines using three different Aurifil wt40 threads. This was actually the first time I quilted with my new Juki and I loved it!!
I also like that the bag looks so different at each side.
Inside the zipper pockets I have the less needed tools such as wonder clips, hera marker, measuring tape and small ruler, additional scissors and a finger hat.
I am currently making another bag as a present for my friends since I have a lot more scrappy strips left over to use for the outside of the bag.
I'm using the same fabrics again for the second bag apart from the pink fabric to the right in the photo. I realised that one open pocket in my bag is all in one colour (the mustard/white print) and to add a bit more variety I'm going with pink from the inside.
For the binding I used one of my favourite fabrics: Carolyn Friedlander's cross hatch in mustard.
I have also attached a little pink ribbon to the outer zipper, that is a little bit easier to open and looks good.
This will not be my last Sew Together Bag, I need at least two more in my house for various items to store. Also, this makes a great present!
The pattern can be found here and is by Michelle of SewDemented.
Saturday, 12 November 2016
Porcupine Playground triangle quilt
My triangle quilt is finished!
And I took it out to a really cool steel structure close to my home, the Tetraeder (engl.: Tetrahedron).
I couldn't be happier with this quilt. I love the colours, I didn't know I had a thing for purple! You can read here about making the quilt and what inspired me.
I always like to throw in some colour splashes in my quilts. In this case it's the three orange triangles which I think are a perfect little eye catcher.
For the back I used up all of the left over half triangles and created an improv back which I also like a lot.
Little orange splashes just needed to go in here, too.
I went with straight line quilting at 1/2'' apart and used 5 different coloured thread which match the colours of the triangles. I love how in some triangles you can see the thread very clearly and in other triangles the same thread is perfectly disguised.
That's my favourite 40wt Aurifil thread I used.
It was a beautiful autumn day here today and the Tetraeder was just the perfect back drop. The steel structure is placed on a land fill hill created by coal mines, which were very active in this area from the early 1950s until the last mine closed down in 2015.
The Tetraeder was erected 1995 and has two platforms, the highest is at 38m above ground. Of course we went all the way up to take some more photos.
It was very windy up there, so once again I have to thank my husband for being so patient holding up my quilt.
That's what you see when you look down from the highest platform:
And that's the view at the surrounding area. 'Das Ruhrgebiet', my home!
Lovely autumn day!
The stairs are quite wobbly, that's nothing for the faint- hearted!
But that's exactly why I came here! Look at this! Do you see the three triangles at the bottom of the structure? Almost the same shape!
You can guess that my little Architect heart is all excited by this simple but oh so beautiful structure and I won't bore you any longer.
Here is the back of the quilt again. The quilt measures 52x80'' (or 1.33 x 2.04m).
Once again I had so much fun with the improv piecing of the back, I think I have to do more of this!
Linking this to Modern Patch Monday of the Modern Cologne Quilters
Sew Cute Tuesday
Quilt Story
Finish up Friday at Crazy Mom Quilts
and Finish or Not Friday at Busy Hands Quilts
And I took it out to a really cool steel structure close to my home, the Tetraeder (engl.: Tetrahedron).
I couldn't be happier with this quilt. I love the colours, I didn't know I had a thing for purple! You can read here about making the quilt and what inspired me.
I always like to throw in some colour splashes in my quilts. In this case it's the three orange triangles which I think are a perfect little eye catcher.
For the back I used up all of the left over half triangles and created an improv back which I also like a lot.
Little orange splashes just needed to go in here, too.
I went with straight line quilting at 1/2'' apart and used 5 different coloured thread which match the colours of the triangles. I love how in some triangles you can see the thread very clearly and in other triangles the same thread is perfectly disguised.
That's my favourite 40wt Aurifil thread I used.
It was a beautiful autumn day here today and the Tetraeder was just the perfect back drop. The steel structure is placed on a land fill hill created by coal mines, which were very active in this area from the early 1950s until the last mine closed down in 2015.
The Tetraeder was erected 1995 and has two platforms, the highest is at 38m above ground. Of course we went all the way up to take some more photos.
It was very windy up there, so once again I have to thank my husband for being so patient holding up my quilt.
That's what you see when you look down from the highest platform:
And that's the view at the surrounding area. 'Das Ruhrgebiet', my home!
Lovely autumn day!
The stairs are quite wobbly, that's nothing for the faint- hearted!
But that's exactly why I came here! Look at this! Do you see the three triangles at the bottom of the structure? Almost the same shape!
You can guess that my little Architect heart is all excited by this simple but oh so beautiful structure and I won't bore you any longer.
Here is the back of the quilt again. The quilt measures 52x80'' (or 1.33 x 2.04m).
Once again I had so much fun with the improv piecing of the back, I think I have to do more of this!
Linking this to Modern Patch Monday of the Modern Cologne Quilters
Sew Cute Tuesday
Quilt Story
Finish up Friday at Crazy Mom Quilts
and Finish or Not Friday at Busy Hands Quilts
Subscribe to:
Posts (Atom)


